- 浏览: 359131 次
-

文章分类
最新评论
-
tobeornottobe:
这个确实非常的不错,WebStorm 6都出来了,WebSto ...
js ide WebStorm 使用总结 -
harbey:
不错。要是能够再详细一点就更好了!继续加油
OpenSSL笔记 -
philobc:
有标题党的嫌疑,那源码是非常老的版本的,劝楼主别高兴得太早了
jQuery EasyUI相关问题及资源(未混淆的源码地址)
iOS: iphone在真机测试以及apns的设置
Step 1: Create cert request file。(当你在apple web site "provisioning portal"里生成"Development Certificate" 和 "Push SSL Certificate"时就会用到它)
1. Access "keychain access" by selecting "Application > Utilities > keychain access"
2. select menu "keychain access > certificate assistant > request certificate from a certificate authority"
3. set "User Email Address" asthe same email address that you used to sign up for the iOS Developer Program, and set "Common Name" as "MobileCAP", leave "CA Email address" empty, and tick "Save to disk" option, click Continue button
4. set “Save the file” as “MobileCAP.certSigningRequest”.
当完成step 1后,就会在Keychain Access的“Keys” section里生成了name为"MobileCAP"的public key and private key pair
Step 2: export "MobileCAP" private key to a ".p12" file(该文件会在后面生成apns provider的.p12 or .pem file时用到)
1. right click "MobileCAP“ private key and select "Export MobileCAP..."2.Save the private key as “MobileCAPKey.p12” file, click Save button
3. 这时会让你输入2次用于加密该.p12 file的密码,例如用"123456",接着会要求你输入一次your mac account password
Step 3: Generate a "development certificate" file and download it(会生成一个cert file,该cert会被import to keychain access里,若你要在真机上调试app,这步是必须的,另外该development certificate会在后面创建provisioning profile时用到)
注意:"development certificate"是与developer account对应的,即一个developer account只能生成一个"development certificate"。如果你之前已经创建过该cert, then just download it
1. 在apple web site "provisioning portal > Certificates" page, click "request certificate" button
2. 然后选定step 1生成的cert request file "MobileCAP.certSigningRequest"
3. follow the wizard, 就会生成一个cert file "ios_development.cer" file, and thenclick the "download" link to download it
Step 4: 创建Registered device (这是把你要进行调试app的device添加到apple web site "provisioning portal > Devices" page,若你要在真机上调试app,这步是必须的,另外在后面创建provisioning profile时要把该device包含进去,否则无法在该device上调试)
1. 在apple web site "provisioning portal > Devices" page, click "Add Device" button
2. 输入device name (任意名字)and device id (把你的device连接到电脑后,在iTunes可以查到device id)
Step 5: Create App ID (若你要在真机上调试app,这步是必须的,另外它会在后面创建provisioning profile时用到,每个provisioning profile只对应一个app ID)
关于App ID和你创建的project的product name, company identifier的关系参看http://blog.csdn.net/totogogo/article/details/7377870
App ID是开发和预配置系统的重要组件。这个唯一的ID允许应用程序与Apple Push Notification服务以及与外部硬件附件通信。App ID也可以用于在一组应用程序内共享密钥链数据,比如密码。另外它还用于configuration data between your applications using iCloud
任何单个应用程序ID都是由包种子(bundle seed)ID和包标识符(bundle identifier)组成的。包种子ID是由10个字符组成的唯一字符串。这个ID也可用于在利用单个应用程序ID构建的多个应用程序之间共享密钥链访问,还可以把这个ID合并到你可能希望用其扩展iPhone应用程序的多种硬件附件中。
包标识符可以是唯一的应用程序名称,或如果你想使用通配符包ID,则它也可以是星号(*)。当你想为多个应用程序使用单个应用程序ID时,这会很有用。例如,在开发原型时,我使用了名为“test”的应用程序ID,它为其包ID使用了一个星号。在我的iPod和iPhone上安装的所有开发构建软件上都使用这一个ID。要注意的一件事情是:只有使用显式的应用程序ID,才能使用Apple Push Notifications。
1. 在apple web site "provisioning portal > App IDs" page, click "new app ID" button
2. 输入"Description" (任意取),“Bundle Identifier (App ID Suffix)” 为 "edu.cityu.MobileCAP", "Bundle Seed ID (App ID Prefix)"的值是固定用上了Team ID
3. click Submit button
Step 6:Enable APNS in the App ID created by step 5, generate apns cert file and download it (若你的app要带push notification功能,这步是必须的。)
注意:若你生成provisioning profile时没有enable apns,而当你之后enable apns时,就要delete旧的provisioning profile,然后生成一个新的。否则当你运行带apns feature的app时不会弹出notification allow or deny 提醒窗口,但也不见有任何错误信息,总之就是用不到push notification!
1. 在apple web site "provisioning portal > App IDs" page, click "configure" link of the App ID created by step 5
2. tick "Enable for Apple Push Notification service" option, and then click "configure" button of "Development Push SSL Certificate"
3. 在弹出的"Apple Push Notification service SSL Certificate Assistant"窗口里,选定step 1创建的cert request file,follow the wizard,就会生成一个apns cert file named "aps_development.cer"
4. download the cert file
5. 这时你会在apple web site "provisioning portal > App IDs" page看到,你的这个App ID 在"push notification"这个column里是“Enabled for Development”
Step 7:create Provisioning Profile, download the file and add it to your device (若你要在真机上调试app,这步是必须的,Provision Profile实际上才是真正真机上需要添加的东东,没有它,无法真机调试。Provision Profile里集成包含了step 3创建的development cert, step 4创建的device和step 5创建的app ID的信息)
1. 在apple web site "provisioning portal > Provisioning" page, click "new Profile" button
2. 输入"Profile Name" (任意取)
3. 选择该profile要包含的certificates (可以包含多个)
4. 选择该profile要包含的App ID (只能选择一个)
5. 选择能够用来真机调试的devices (最好全选)
6. click submit button
7. download the provisioning profile file (extension is ".mobileprovision")
- //Letthedeviceknowwewanttoreceivepushnotifications
- [[UIApplicationsharedApplication]registerForRemoteNotificationTypes:
- (UIRemoteNotificationTypeBadge|UIRemoteNotificationTypeSound|UIRemoteNotificationTypeAlert)];
3.在AppDelegate.mfile里添加下列2个methods (用来handle register remote notification with device token和register error的events)
- -(void)application:(UIApplication*)applicationdidRegisterForRemoteNotificationsWithDeviceToken:(NSData*)deviceToken
- {
- NSLog(@"Mytokenis:%@",deviceToken);
- }
- -(void)application:(UIApplication*)applicationdidFailToRegisterForRemoteNotificationsWithError:(NSError*)error
- {
- NSLog(@"Failedtogettoken,error:%@",error);
- }
4. 运行该app in real device (simulator doesn't support push notification)。这时你会在device上看到一个popup window (该窗口只会出现一次,重装app不会再出现),提示你该app会send push notification给你,如果同意则clickOK,不同意则click "Now allow”。如果选择了OK,那么在"Setting > Notifications“里会有你的app在list里。而且这时你的Xcode output console会显示你的device token。
- opensslx509-inaps_development.cer-informder-outMobileCAPCert.pem
- opensslpkcs12-nocerts-outMobileCAPKey.pem-inMobileCAPKey.p12
- catMobileCAPCert.pemMobileCAPKey.pem>MobileCAPCK.pem
- telnetgateway.sandbox.push.apple.com2195
- Trying17.172.233.65...
- Connectedtogateway.sandbox.push-apple.com.akadns.net.
- Escapecharacteris'^]'.
Press Ctrl+C to close the connection.
- openssls_client-connectgateway.sandbox.push.apple.com:2195-certMobileCAPCert.pem-keyMobileCAPKey.pem
执行过程中会要你输入MobileCAPKey.pem生成时设置的密码。如果connect server成功,就会等待你输入字串,你可以输入任意字串,然后回车,就会disconnectserver。如果连接不成功,则openssl会显示错误信息。
注意:实际上有2个APNS servers: the “sandbox” server (用于testing) the live server(用于production mode)。我们这里测试的是sandbox server。live apns server的操作类似。
Step 13创建provider server side (php version)
1. DownloadSimplePush PHP codeto your mac machine and then unzip it.
2. 去掉SimplePushfolder里的pk.pem (它没用),把step 11.4生成的"MobileCAPCK.pem" copy toSimplePushfolder
3. 修改simplepush.phpfile下面几行:
// Put your device token here (without spaces):
//device token来自Step 10的第4点,在output console获取,注意:要去掉前后的尖括号,和中间的所有空格
$deviceToken= '43fcc3cff12965bc45bf842bf9166fa60e8240c575d0aeb0bf395fb7ff86b465';
// Put your private key's passphrase here:
//该值是step 11.3生成MobileCAPKey.pem时设置的密码
$passphrase= '123456';
// Put your alert message here:
$message= 'My first push notification!';
//.....
stream_context_set_option($ctx, 'ssl', 'local_cert', 'MobileCAPCK.pem');
4. 在terminal window里,go to the simplepush folder,然后执行下列命令,你的iPhone应该会收到一条push message。
- phpsimplepush.php
注意:如果你的app在iphone里是正在运行,而且app是在front end时,当它收到push message时是不会出现在iPhone顶部的notification area的!
Step 14创建provider server side (c# version)
step 11生成了用于php的APNS cert (extension is pem),而如果用c#作为apns provider,则要使用.p12 format cert,它的生成方式比step 11简单很多:step14.1. open "keychain access",然后找到"login > My Certificates > Apple Development IOS Push Services: xxxx" cert(该cert是在step 8导入到keychain access的)
你会看到该cert下包含了Step 1生成的private key
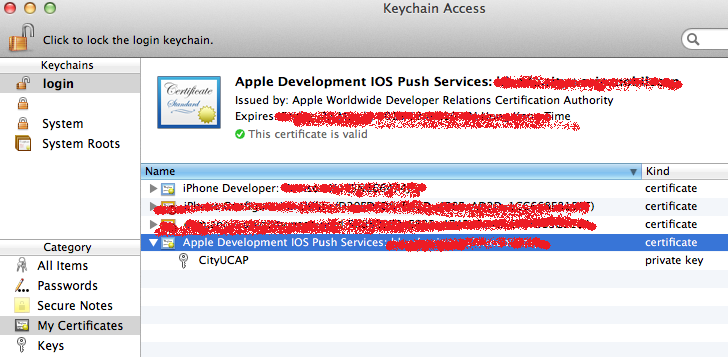
step14.2. right click this cert, and select "Export xxx......" to save as .p12 format (e.g.MobileCAPCK_For_CSharp.p12),过程中会要你输入保护该cert的密码
step14.3. 下载apns-shary, 解压后,double click "JdSoft.Apple.Apns.sln" to open the project。然后我们只需要"JdSoft.Apple.Apns.Notifications"和"JdSoft.Apple.Apns.Notifications.Test",其他的都可以删掉。Right click "JdSoft.Apple.Apns.Notifications.Test", select "Set as Startup Project"

step14.4把step14.2生成的MobileCAPCK_For_CSharp.p12file复制到“JdSoft.Apple.Apns.Notifications.Test\bin\Debug”目录下
step14.5打开"JdSoft.Apple.Apns.Notifications.Test"下的"Program.cs",修改下面几行
- //Putyourdevicetokeninhere
- stringtestDeviceToken="fe58fc8f527c363d1b775dca133e04bff24dc5032d08836992395cc56bfa62ef";
- //PutyourPKCS12.p12or.pfxfilenamehere.
- //Assumesitisinthesamedirectoryasyourapp
- stringp12File="apn_developer_identity.p12";
- //Thisisthepasswordthatyouprotectedyourp12File
- //Ifyoudidnotuseapassword,setitasnulloranemptystring
- stringp12FilePassword="yourpassword";
Step 14.7 把APNS-SHARP移植到web project里
1. In visual studio, create a new "web site"
2.right click the web site root node, select "Add reference...", select "browse" tab, and then choose "Newtonsoft.Json.Compact.dll" in APNS-SHARP libray "reference" folder
2. right click the web site root node, select"Add ASP.NET Folder > App_Code".
3. right click "App_Code" node, select "new folder", folder name任取。然后把APNS-SHARP libray "JdSoft.Apple.Apns.Notifications"目录里的所有.cs文件copy到该新建目录下。
4. 把step14.2生成的MobileCAPCK_For_CSharp.p12file复制到web site root node下。
5. 然后把APNS-SHARP libray "JdSoft.Apple.Apns.Notifications.Test"目录里的Program.cs里代码适当改下,然后复制到Default.aspx.cs里(记得要import JdSoft.Apple.Apns.Notifications),就做成一个最简单的asp.net push notification web site.
参考文档:
iphone在真机测试
http://www.cocoachina.com/bbs/read.php?tid=68636
http://hi.baidu.com/zhaodingfeng/blog/item/381b7e54025cab42564e00fa.html
在真机测试其实最终是体现在xcode > window > organizer里,打开organizer窗口后,最顶有个"Documentation",查看organization的帮助文档
apns
http://www.cnblogs.com/zhuqil/archive/2011/06/05/2070679.html
http://wsqwsq000.iteye.com/blog/1404282
http://blog.csdn.net/kmyhy/article/details/6688370
aspn provider c# version https://github.com/Redth/APNS-Sharp


发表评论

相关推荐
iOS 测试推送消息相关工具:为了发送推送,您需要加入一个或多个待推送设备的令牌(Token),一共有三种加入方式:手动输入、文件读取、网络发送。添加令牌时记得为您刚刚添加的令牌命名(可随意起名)。
关于IOS_APNS推送消息(iphone端+服务端)。关于IOS_APNS推送消息(iphone端+服务端)。
iOS苹果推送apns测试工具
烧瓶推杆 Flask扩展,用于在APNS(iOS)和GCM(Android)上推送通知。 ***警告:项目已弃用,不再保留***链接项目: : 说明文件: : PyPi: ://pypi.python.org/pypi/flask-pushjack/ TravisCI: ://travis-ci....
iOS创建apns证书步骤
IOS开发消息推送 APNS python 源码, 纯自己实现协议, 无需安装额外库 代码简洁, 用户可以自己随意修改使用, 无需安装其他库, 直接发消息, 指定自己的证书即可. 找了很多代码,都不好使, 自己写的
IOS APNS 官方开发文档 英文版本
APNS证书制作及备份 ios 开发制作push证书(apns)教你如何制作通知推送的证书(pem格式)
本资源是IOS远程推送的后台PHP程序,有完整的源代码和Demo,方便同学们做远程推送后台程序的编写和测试之用!
这意味着,即使在iOS上,您也需要设置Firebase并与Google通信以发送推送通知。 该插件通过提供本机APNS实施解决了该问题,同时保留了已配置的Android Firebase。 用法 根据说明在Android上配置firebase: : 。 在...
Java APNS推送消息 HTTP/2协议, 基于JDK 11及以上
IOS消息推送之APNS - iOS知识库1
IOS推送APNS必须的三个包 做服务器必备,使用教程http://blog.csdn.net/maple1320/article/details/24260513
Easy APNs Provider iOS VOIP 推送 iOS Mac
围裙 由node / io驱动的apns
用https实现iphone消息推送,短连接形式 有问题,请留言
java(后台) ios 推送(APNS) 源码+支持jar包,代码经测试没问题,包含4个jar包:javaAPNS2.2、log4j、org.bouncycastle.jce1.39.0、apache.common.lang所属包
使用Nodejs调试iOS的APNS通知推送,如此简单。Use Node.js language test iOS apns pusn
千斤顶 推送有关APNS(iOS)和GCM(Android)的通知。 ***警告:项目已弃用,不再保留***链接项目: : 说明文件: : PyPi: ://pypi.python.org/pypi/pushjack/ TravisCI: ://travis-ci.org/dgilland/pushjack...
APNs的推送的Demo,适配iOS8.0+。